ShopDreamUp AI ArtDreamUp
Deviation Actions
Description
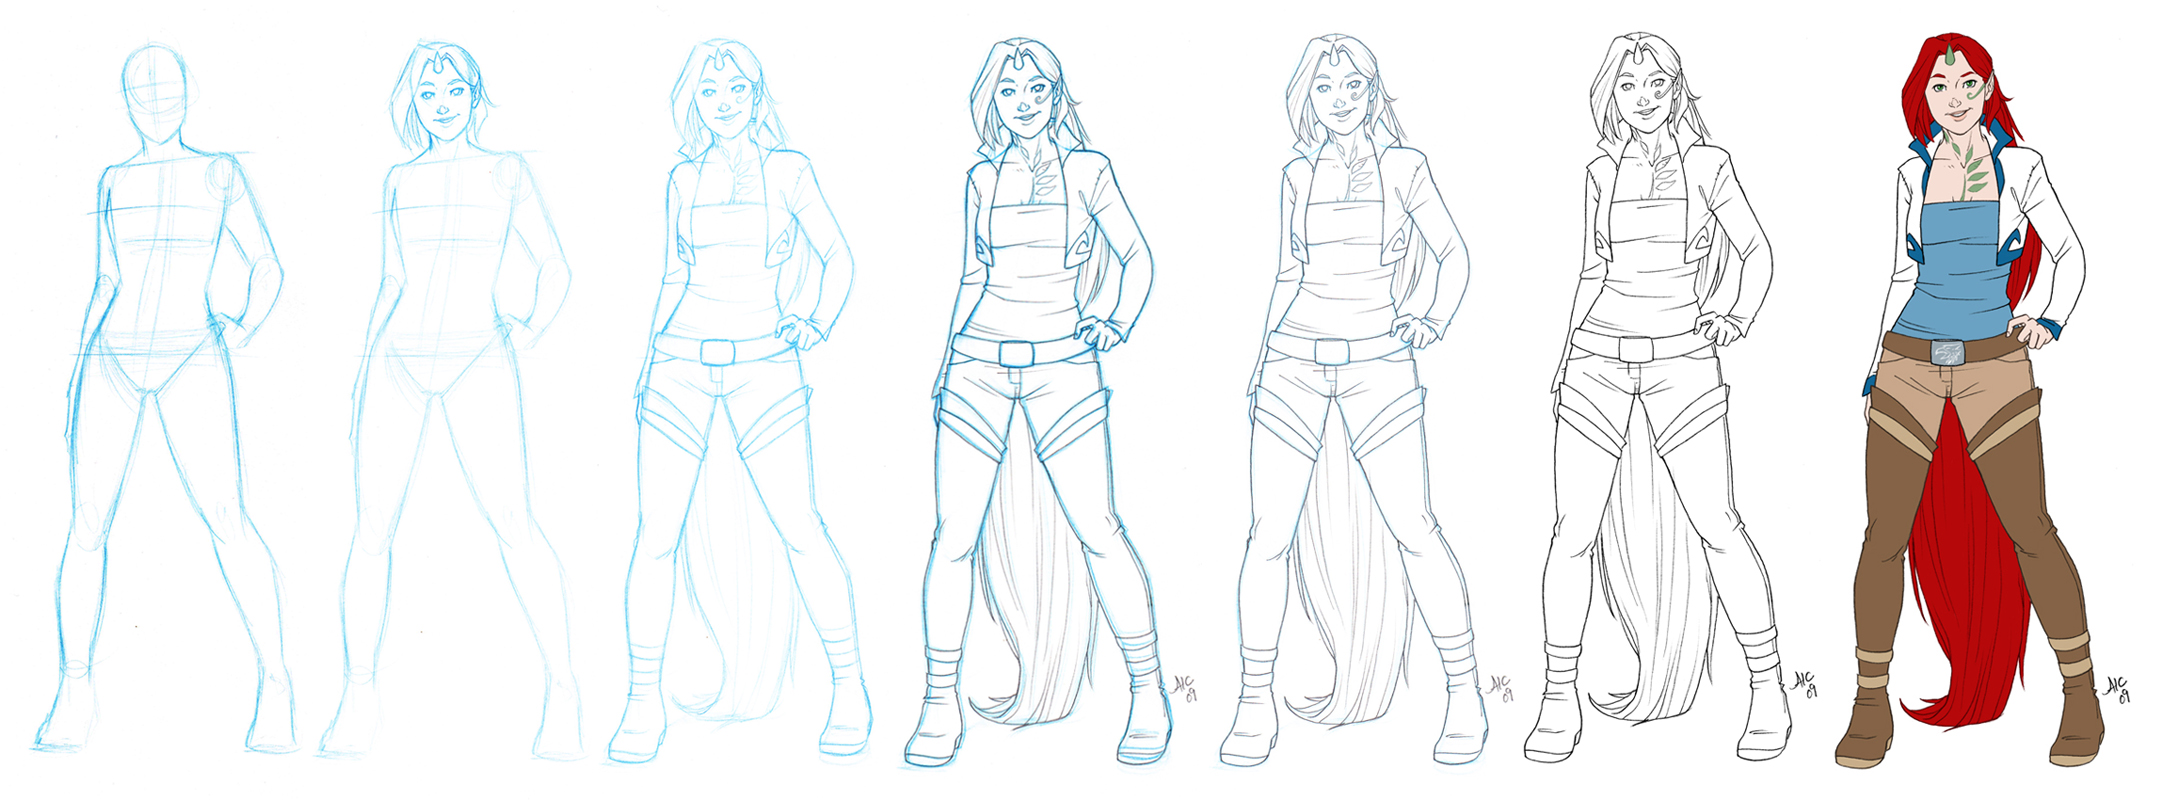
Well, it's not so much a tutorial as a "Here's how I do it, folks." I'd feel pretentious doing a tutorial, anyway. But I'm happy to share a WiP view of my process! This is my Unavisi character Yew, which I recently whipped out quickly to provide a required color reference. On a whim, I scanned the wip every now and then to show my progress.
For the most part, I just work on computer printer paper. I like Brightness 96, Weight 24. The brighter paper helps me get a crisper image, and I just like the feel of the heavier paper.
Note: I upped the levels on the first four steps in Photoshop so that the blue lines are more visible.
1. Col-erase pencil. This is how I start every figure, mostly with basic forms, just sketching out the human body roughly to make sure everything is proportioned right before going into any details. I generally start with the head and draw the spine/action line from there to rough out the pose.
2. More col-erase. Once the body is roughed out, I start in on the face. I'd like to argue that starting at the top and working my way down the pages keeps the smudging at a minimum.... but I just really like doing the faces. I fill in all the facial details before moving on to the rest of the body. Kids, don't do this at home.
3. Col-erase. Once the face is done, I work my way down the page. Hair, neck, chest and torso, arms, hips, thighs, calves, feet - all in order from top to bottom. Often I'll leave one part semi-unfinished, work on another quickly, then go back to finish the previous part. I don't really think it through too much. I just follow my pencil.
4. 2B graphite pencil. Once all the details are in, I go in with my 2B pencil. I find it is just the right hardness/darkness for what I need. This part's pretty easy, but I keep sharpening my pencil a lot to keep the lines clean.
5. And then I clean up the blue a bit if I am so inclined.
6. Canon scanner, Intuos2 tablet, Photoshop CS4. Once the clean pencil lines are done, I scan my picture. If I decide that I don't want the blue lines in there anymore, I drop them out in Photoshop (via the Channels tab). I have an old Intuos2 tablet, which I use to clean up and rework the lineart in photoshop. Sometimes I do a lot of "re-inking" this way, redoing entire sections with my stylus. This image needed very little work, as I remember. When I am doing commissions, I do a lot of digital inking at this point to make sure I have a smooth hi-res file for the client.
7. Photoshop CS4, Intuos2. Here, I filled in colors really quickly (since it was just meant to be a fast color reference image). When I'm coloring quickly like that, I just create a new layer over the lineart, set it to multiply, and go to town.
For the most part, I just work on computer printer paper. I like Brightness 96, Weight 24. The brighter paper helps me get a crisper image, and I just like the feel of the heavier paper.
Note: I upped the levels on the first four steps in Photoshop so that the blue lines are more visible.
1. Col-erase pencil. This is how I start every figure, mostly with basic forms, just sketching out the human body roughly to make sure everything is proportioned right before going into any details. I generally start with the head and draw the spine/action line from there to rough out the pose.
2. More col-erase. Once the body is roughed out, I start in on the face. I'd like to argue that starting at the top and working my way down the pages keeps the smudging at a minimum.... but I just really like doing the faces.
3. Col-erase. Once the face is done, I work my way down the page. Hair, neck, chest and torso, arms, hips, thighs, calves, feet - all in order from top to bottom. Often I'll leave one part semi-unfinished, work on another quickly, then go back to finish the previous part. I don't really think it through too much. I just follow my pencil.
4. 2B graphite pencil. Once all the details are in, I go in with my 2B pencil. I find it is just the right hardness/darkness for what I need. This part's pretty easy, but I keep sharpening my pencil a lot to keep the lines clean.
5. And then I clean up the blue a bit if I am so inclined.
6. Canon scanner, Intuos2 tablet, Photoshop CS4. Once the clean pencil lines are done, I scan my picture. If I decide that I don't want the blue lines in there anymore, I drop them out in Photoshop (via the Channels tab). I have an old Intuos2 tablet, which I use to clean up and rework the lineart in photoshop. Sometimes I do a lot of "re-inking" this way, redoing entire sections with my stylus. This image needed very little work, as I remember. When I am doing commissions, I do a lot of digital inking at this point to make sure I have a smooth hi-res file for the client.
7. Photoshop CS4, Intuos2. Here, I filled in colors really quickly (since it was just meant to be a fast color reference image). When I'm coloring quickly like that, I just create a new layer over the lineart, set it to multiply, and go to town.
Image size
2178x800px 794.01 KB
Make
Canon
Model
CanoScan LiDE 200
© 2009 - 2024 AmyClark
Comments74
Join the community to add your comment. Already a deviant? Log In
Cool tutorial. Thanks!


![Sketchdump May 2016 [Perspective 2]](https://images-wixmp-ed30a86b8c4ca887773594c2.wixmp.com/f/060c5b2a-d29c-4413-a193-8ea0726072c5/da3uy13-cb949ed7-1600-4df2-a738-c58fc2e91eda.jpg/v1/crop/w_184)


